
March 24: Paper Plate Weaving
Assigned Teachers: Dasuni, Suren, Piyumika, (Elina: Absent)
Today’s exercise is simple and meditative, and with a lot of patience you will achieve beautiful results.

Done by Building Hope students in 2015!
You will need:
Pencil
Ruler
Scissors
Wool (Art class will provide)
Paper Plates or a 9” cardboard circle cutout
A small piece of Iratu or a toothpick
Guide
1. Divide the paper plate into sections.
Start by using a pencil and ruler to divide the plate into sections. Young kids will do better with about 7 or 9, but older kids can do 11 or more. The important part is to make sure the number of sections you use is an odd number.
Draw straight lines on the back of the plate. If your plates have scallops, it’s easier to make them even. But it’s not essential, so don’t spend too much time drawing and redrawing the lines.

2. Cut slits into sections.
Next, cut down the lines you drew to make each section a flap. Cut the slit about 1 to 1.5 inches from each edge, leaving plenty of space in the center.

3. Create the yarn loom.
Take a piece of yarn several yards long and wrap it in a starburst pattern around the paper plate. Start at one of the slits and leave a long starting tail that can reach the center, then wrap across the front to the slit that is opposite. (It won’t be directly across because we’ve got an odd number, so pick the one slightly to one side, clockwise.) Wrap around the back, then toward the next slit clockwise beside the original one.
Repeat the process until you’ve gone through each slit one time. After you bring the yarn through the last slit, pull it toward the center and tie it in a knot so that it pulls all the yarn triangles toward the center of the plate.
You can cut off this tail or leave it to weave in at the end; do the same on the back with your starting tail. This will keep the yarn loom in place.

4. Begin weaving the yarn.
To do paper plate weaving, begin in the center with a new piece of yarn and weave it over and under each strand of the yarn loom.
As you add rows, slide yarn toward the center as you go so that there aren’t any big gaps. This will help the finished piece stay flat.

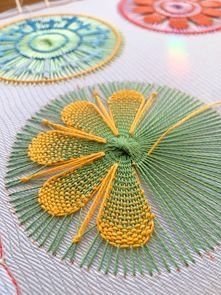
An example of a more complex weave for older students